
티스토리 뷰
STS SpringBoot-mybatis-maven Oracle 신규 프로젝트 설정 및 DB 연동 Mapper.xml 방식 예제
뵙뵙 2020. 10. 14. 08:44SpringBoot 를 이용한 신규 프로젝트 생성 방법 및 Oracle JDBC 연동 방법에 대해서 알아보며, Maven을 통한 라이브러리를 관리를 포스팅 해보도록 하겠습니다.
스프링부트를 처음 써봤다 생각했는데, 사실 교육받으면서 대충 하고 넘어갔던 기억이 나네요..
그래서 이번 포스팅하기 전 프로젝트를 하면서 설정 잡는데만 몇시간 날려먹었습니다....
다시는 이런 끔찍한 짓을 하지 않기 위해 기록을 남기도록 해보겠습니다.
우선 저는 STS4 버전을 사용했습니다. ( STS3도 무관할듯? 피씨방이라 빠르게 다운받다보니 원래는 3로 진행했습니다. )
프로젝트 생성
[File] - [New] - [Spring Starter Project] 클릭

신규 프로젝트를 생성할 때 확인해야 할 부분입니다.
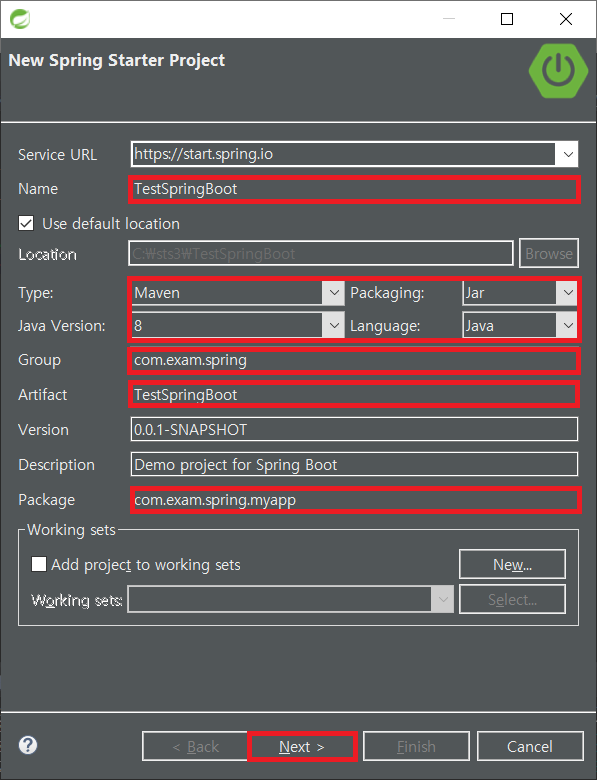
Name : Project 이름입니다. 적당하게 지어주시면 됩니다.
Type, Java Version, Packaging, Language : 라이브러리 관리를 Maven 을 이용할 것이므로 Maven 선택
( 비교적 최근 대세인 Gradle 도 선택 가능 )
Java Version 및 나머지를 본인 환경에 맞게 설정해 줍니다.
Group : 패키지 그룹명입니다.
Artifact : xxxApplication.java 가 생성되는 부분입니다. Eclipse로 치면 Main 클래스 이름이라고 생각하시면 됩니다.
Package : Application.java 파일이 위치할 패키지 명입니다.
SpringBoot 에서 기본적으로 제공하는 Dependency 부분입니다.
SpringBoot Version 확인하신 후 필요한 것들 체크하시면 됩니다.
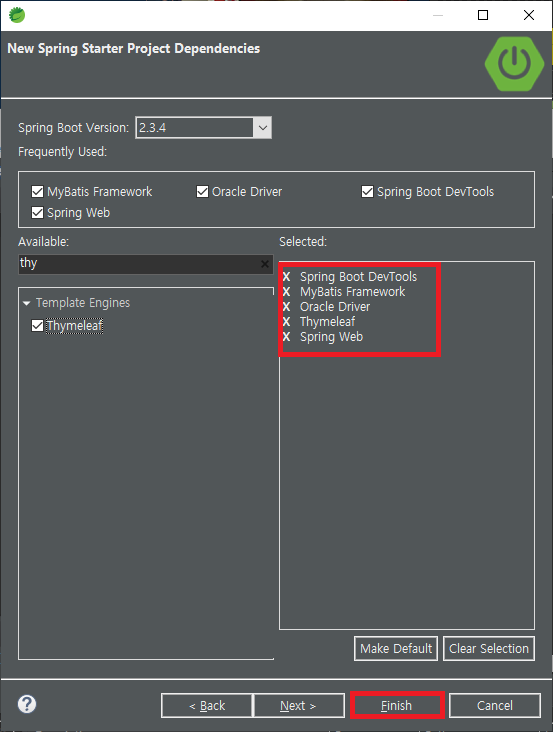
기본적으로 자주 사용하는 라이브러리는 H2, Lombok, web, JDBC, Dev 가 있는 것 같습니다.
DevTools : 설정이 바뀌면 SpringBoot 는 서버를 off 했다가 on 해야 합니다.
Dev 를 사용하시면 서버 on/off 없이 auto restart 기능이라고 보시면 됩니다.
MyBatis : MyBatis 를 사용 라이브러리
Web : 기본적인 MVC 패턴을 사용하는 라이브러리
Thymeleaf : 템플릿 관련 라이브러리 입니다. ( JSP와 Thymeleaf 두가지 방식 다 알아보기 위해 )
* JSP의 view와 같은 담당을 하는 라이브러리
나머지는 pom.xml 을 통해 dependency 를 추가 할 것이기 때문에 크게 지장 없습니다.
보통 처음 프로젝트를 생성하면 가장 먼저 확인 해야 할 부분은
pom.xml, src/main/resources - application.properties 입니다.
pom.xml
너무 길기 때문에 아래 더보기를 클릭해주세요.
저는 라이브러리 관리를 주석 달아놓는 편입니다.
근데, mybatis 주석을 안달았네요 ...ㅎㅎㅎㅎ
|
1
2
3
4
5
6
7
8
9
10
11
12
13
14
15
16
17
18
19
20
21
22
23
24
25
26
27
28
29
30
31
32
33
34
35
36
37
38
39
40
41
42
43
44
45
46
47
48
49
50
51
52
53
54
55
56
57
58
59
60
61
62
63
64
65
66
67
68
69
70
71
72
73
74
75
76
77
78
79
80
|
<?xml version="1.0" encoding="UTF-8"?>
<project xmlns="http://maven.apache.org/POM/4.0.0"
xmlns:xsi="http://www.w3.org/2001/XMLSchema-instance"
xsi:schemaLocation="http://maven.apache.org/POM/4.0.0 https://maven.apache.org/xsd/maven-4.0.0.xsd">
<modelVersion>4.0.0</modelVersion>
<parent>
<groupId>org.springframework.boot</groupId>
<artifactId>spring-boot-starter-parent</artifactId>
<version>2.3.4.RELEASE</version>
<relativePath /> <!-- lookup parent from repository -->
</parent>
<groupId>com.example.spring</groupId>
<artifactId>TestSpringBoot</artifactId>
<version>0.0.1-SNAPSHOT</version>
<name>TestSpringBoot</name>
<description>Demo project for Spring Boot</description>
<properties>
<java.version>1.8</java.version>
</properties>
<dependencies>
<!-- thymeleaf -->
<dependency>
<groupId>org.springframework.boot</groupId>
<artifactId>spring-boot-starter-thymeleaf</artifactId>
</dependency>
<!-- spring web -->
<dependency>
<groupId>org.springframework.boot</groupId>
<artifactId>spring-boot-starter-web</artifactId>
</dependency>
<!-- mybatis -->
<dependency>
<groupId>org.mybatis.spring.boot</groupId>
<artifactId>mybatis-spring-boot-starter</artifactId>
<version>2.1.3</version>
</dependency>
<!-- devtools -->
<dependency>
<groupId>org.springframework.boot</groupId>
<artifactId>spring-boot-devtools</artifactId>
<scope>runtime</scope>
<optional>true</optional>
</dependency>
<!-- oracle jdbc -->
<dependency>
<groupId>com.oracle.database.jdbc</groupId>
<artifactId>ojdbc8</artifactId>
<scope>runtime</scope>
</dependency>
<dependency>
<groupId>org.springframework.boot</groupId>
<artifactId>spring-boot-starter-test</artifactId>
<scope>test</scope>
<exclusions>
<exclusion>
<groupId>org.junit.vintage</groupId>
<artifactId>junit-vintage-engine</artifactId>
</exclusion>
</exclusions>
</dependency>
</dependencies>
<build>
<plugins>
<plugin>
<groupId>org.springframework.boot</groupId>
<artifactId>spring-boot-maven-plugin</artifactId>
</plugin>
</plugins>
</build>
</project>
|
cs |
|
|
|
<thymeleaf>
thymeleaf 를 사용하는 라이브러리 입니다.
JSP의 view로 처리하는 로직에서 view를 사용하지 않고, view 역할을 templates 에서 하게 됩니다.
application.properties 부분에서 JSP view 로직을 사용하게 되면, 주석처리 하셔야 합니다. ( *충돌 )
후에 JSP 및 JSTL 관련 라이브러리 추가 예정
<spring web>
기본적인 MVC 패턴으로 프로젝트를 구성하기 위한 라이브러리
<mybatis>
mybatis 를 통한 sql문 관리 라이브러리
<devTool>
설정이 바뀌면 auto restart 라이브러리
<oracle JDBC>
오라클 JDBC 관련 라이브러리 입니다.
application.properties
resources 하위의 application.properties 우클릭 하셔서 [Properties] 에 들어갑니다.
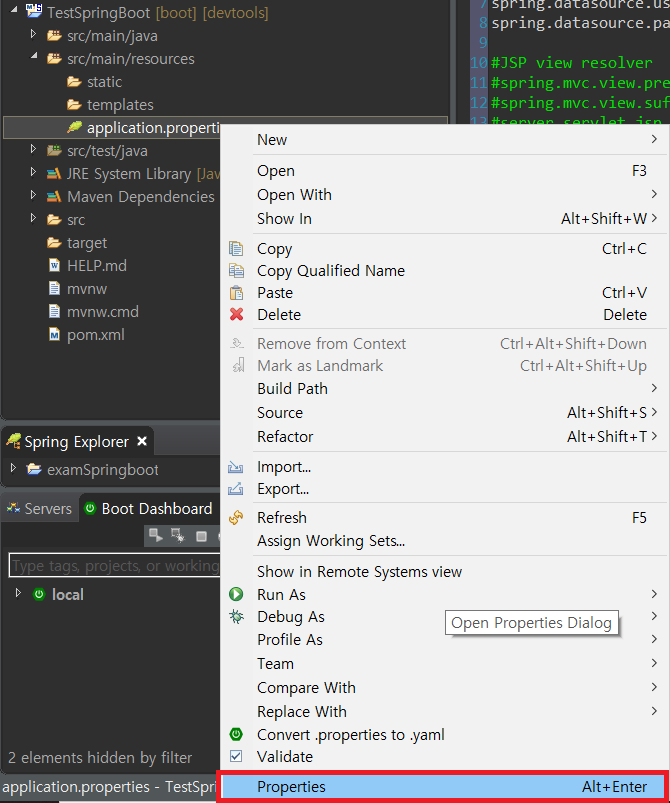
properties 는 기본적으로 한글지원을 하지 않기 때문에 UTF-8 로 변경해줍니다.

application.properties 에 다음과 같이 추가해줍니다.
|
1
2
3
4
5
6
7
8
9
10
11
12
13
14
15
16
17
18
19
20
21
22
23
|
#http port
server.port=5043
#db connection(Oracle)
spring.datasource.driver-class-name=oracle.jdbc.OracleDriver
spring.datasource.url=jdbc:oracle:thin:@localhost:1521/orcl
spring.datasource.username=(userId)
spring.datasource.password=(userPassword)
#thymeleaf auto refresh
spring.thymeleaf.cache=false
# mybatis mapping
# mapper.xml
mybatis.type-aliases-package:com.example.spring.myapp.model
# mapper.xml location
mybatis.mapper-locations: mybatis/mapper/**/*.xml
|
cs |
#http port
기본적으로 톰캣이 내장되어 있으며, 기본포트 8080 대신 다른 포트를 사용하는 설정입니다.
#db connection(Oracle)
JDBC 연동을 위한 설정입니다.
#custom error page
사용자 설정 error 페이지 셋팅
#thymeleaf auto refresh
thymeleaf 변경시 오토 refresh
#mapper.xml
.xml Mapping 시 resultType에 풀패키지명 대신 간략화 하는 설정
#mapper.xml location
mapper.xml 파일의 경로를 설정해주는 부분
기본적인 셋팅 이후 차근차근 프로젝트에서 필요한 패키지, class생성과 properties 재설정, oracle을 통한 간단한 Table 생성을 통해 라이브러리 연동을 확인해보도록 하겠습니다.
프로젝트 패키지 생성
src/main/java 하위에 패키지를 생성하도록 하겠습니다.
[ com.example.spring.myapp ] 패키지 우클릭 - [ New ] - [ Package ] 클릭
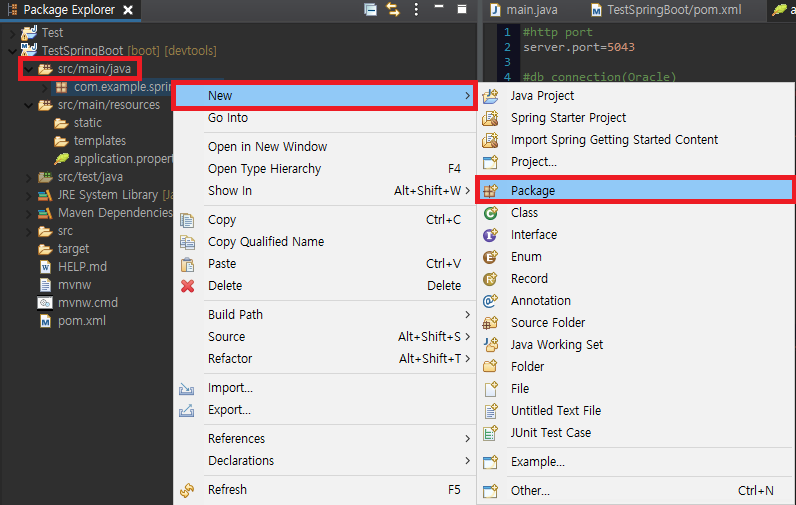
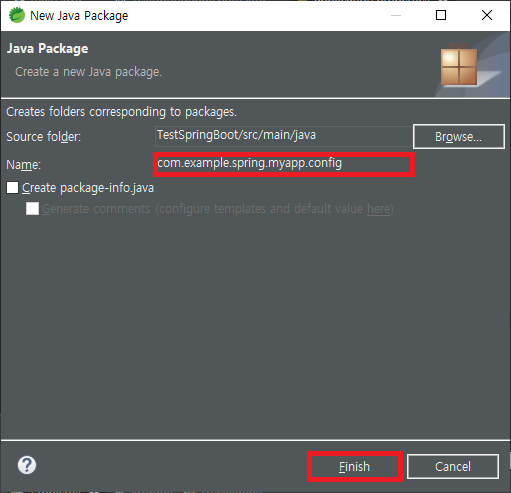
위의 화면에서 아래와 같은 패키지명들을 생성해줍니다.
추가적으로 설명을 드리자면, 이번 예제에서는 단순하게 화면을 List map을 통해 Table 결과를 뿌려주기만 할 계획이기 때문에, DTO 클래스를 추가하지 않았습니다. ( 하지만 Getter/Setter를 만들어 두셔도 무관합니다. )
insert가 필요하게 된다면 후에 생성하도록 하겠습니다.
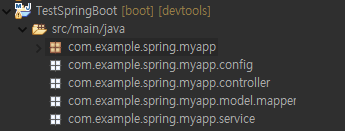
각각의 패키지에 들어갈 내용들을 미리 설명하겠습니다.
com.example.spring.myapp.config
각종 외부 설정들의 Bean 등록을 위한 패키지입니다.
com.example.spring.myapp.controller
클라이언트의 요청을 처리할 패키지 입니다.
com.example.spring.myapp.model.mapper
DB에 접근을 위한 패키지 입니다. (mapper = DAO 라고 생각하시면 됩니다.)
com.example.spring.myapp.service
비지니스 로직을 처리할 패키지 입니다.
이와 같은 로직을 만드는 것을 MVC 패턴이라고 합니다. ( 설명충..죄송합니다. )
model, view, controller 를 만드는 로직인데, 당장 이해가 가지 않는 분이시라면 한번쯤은 MVC 패턴에 대해 검색해 보시길 바랍니다!
TestSpringBootApplication.java에 Mybatis 설정 잡기

|
1
2
3
4
5
6
7
8
9
10
11
12
13
14
15
16
17
18
19
20
21
22
23
24
25
26
27
28
29
30
31
32
33
|
package com.example.spring.myapp;
import javax.sql.DataSource;
import org.apache.ibatis.session.SqlSessionFactory;
import org.mybatis.spring.SqlSessionFactoryBean;
import org.springframework.boot.SpringApplication;
import org.springframework.boot.autoconfigure.SpringBootApplication;
import org.springframework.context.annotation.Bean;
import org.springframework.core.io.Resource;
import org.springframework.core.io.support.PathMatchingResourcePatternResolver;
@SpringBootApplication
public class TestSpringBootApplication {
public static void main(String[] args) {
SpringApplication.run(TestSpringBootApplication.class, args);
}
@Bean
public SqlSessionFactory sqlSessionFactory(DataSource dataSource) throws Exception {
SqlSessionFactoryBean sessionFactory = new SqlSessionFactoryBean();
sessionFactory.setDataSource(dataSource);
Resource[] res = new PathMatchingResourcePatternResolver().getResources("classpath:mybatis/mapper/*.xml");
sessionFactory.setMapperLocations(res);
return sessionFactory.getObject();
}
}
|
cs |
Mapper 생성 ( DAO 생성 )
저도 DAO에 상당히 익숙해진 사람이지만, 다양한 프로젝트를 경험하다보면 여러가지 이름으로 관리를 하고 이에 따라야 합니다. 그렇기 때문에 Mapper 에 익숙하지 않더라도 다양하게 생성해보도록 합니다. (어차피 이름바꾸기지만!)
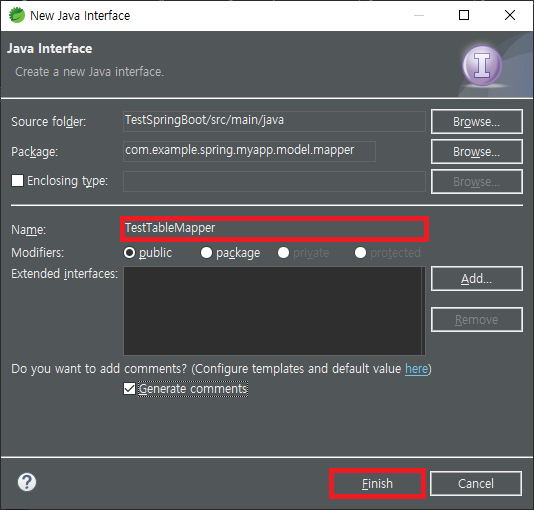
com.example.spring.myapp.model.mapper 하위에 Interface 를 생성해서 접근을 하도록 하겠습니다.
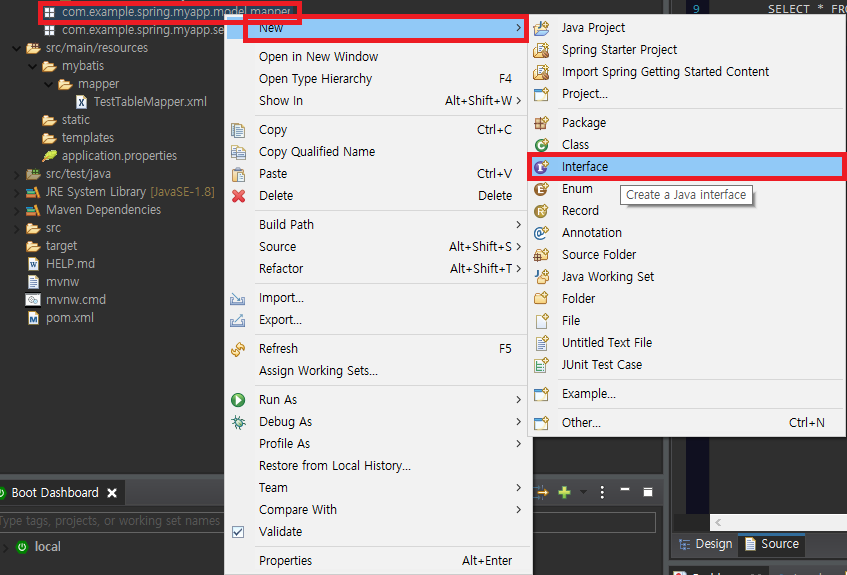
TestTableMapper Interface 생성
(여기서 클래스명과 밑의 .xml 파일의 이름을 동일하게 생성해야 합니다.)
아래와 같은 코드를 작성해 줍니다.
|
1
2
3
4
5
6
7
8
9
10
11
12
13
14
15
16
17
18
19
20
21
22
23
|
package com.example.spring.myapp.model.mapper;
import java.util.List;
import java.util.Map;
import org.apache.ibatis.annotations.Mapper;
@Mapper
public interface TestTableMapper {
//select * from Test_Table
public List<Map<String, Object>> SelectAllList() throws Exception;
}
|
cs |
아주아주 간단한 select * from 문을 List<Map>을 통해 오브젝트로 보여줄 계획입니다.
여기서 SelectAllList 메소드명은 밑의 .xml select id 명과 완전하게 동일해야 하므로 기억해두도록 합니다.
Service Interface 및 ServiceInterface를 적용한 Class 생성
com.example.spring.myapp.service 하위에 Interface 와 class 한개를 생성하겠습니다.
TestTableService Interface 생성 ( 이름이 참... 허접합니다. 좋은 이름을 지어주시길 바랍니다. )

TestTableService 라는 이름으로 인터페이스를 생성합니다.
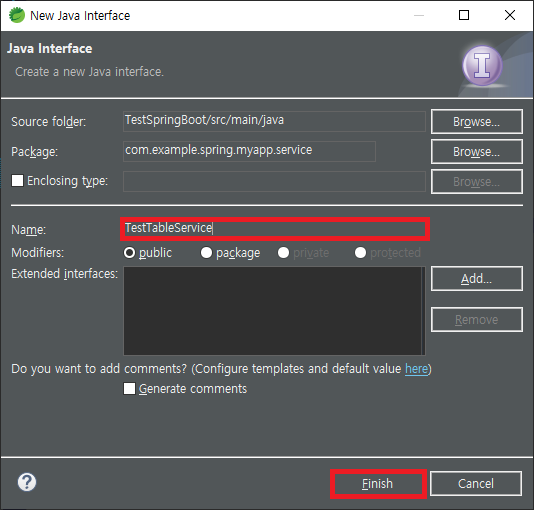
Mapper 와 다른점이 없으며, 입력을 제어할 일이 없지만 MVC 패턴 적용을 위해 작성하도록 하겠습니다.
|
1
2
3
4
5
6
7
8
9
10
11
|
package com.example.spring.myapp.service;
import java.util.List;
import java.util.Map;
public interface TestTableService {
//select * from Test_Table
public List<Map<String, Object>> SelectAllList() throws Exception;
}
|
cs |
com.example.spring.myapp.service 의 하위에 class 생성
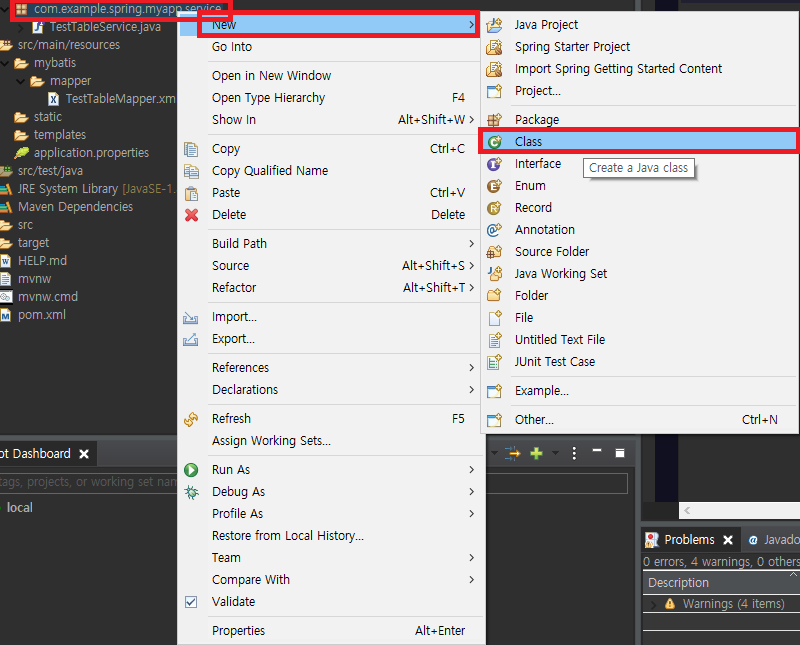
TestTableService Interface 를 적용할 TestTableServiceImpl.class 생성
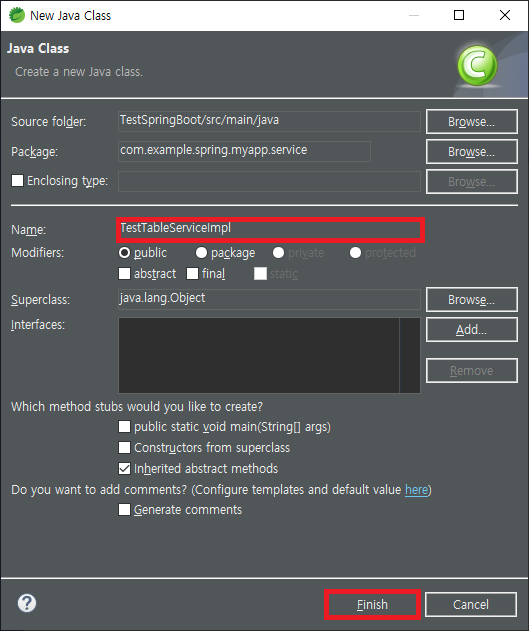
아래와 같이 TestTableService Interface 를 적용한 클래스를 작성해 주고, 리턴할 객체를 작성해 줍시다.
|
1
2
3
4
5
6
7
8
9
10
11
12
13
14
15
16
17
18
19
20
21
22
23
24
|
package com.example.spring.myapp.service;
import java.util.List;
import java.util.Map;
import org.springframework.beans.factory.annotation.Autowired;
import org.springframework.stereotype.Service;
import com.example.spring.myapp.model.mapper.TestTableMapper;
@Service
public class TestTableServiceImpl implements TestTableService{
@Autowired
TestTableMapper testtableMapper;
@Override
public List<Map<String, Object>> SelectAllList() throws Exception {
// TODO Auto-generated method stub
return testtableMapper.SelectAllList();
}
}
|
cs |
Controller 생성
com.example.spring.myapp.controller 하위에 TestTableController class 생성
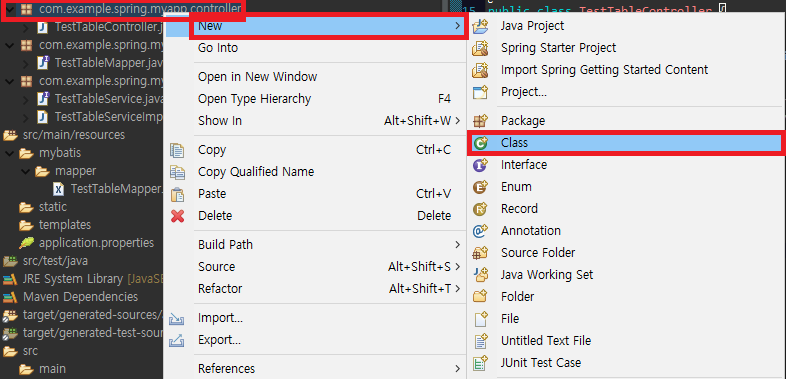
TestTableController.java 생성
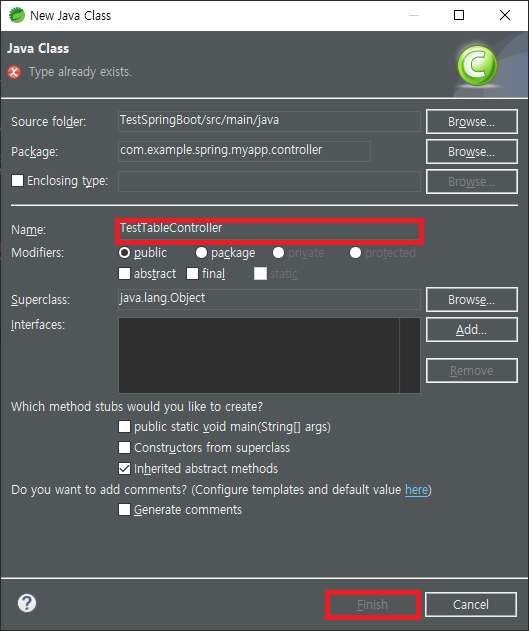
아래 코드를 작성합니다.
|
1
2
3
4
5
6
7
8
9
10
11
12
13
14
15
16
17
18
19
20
21
22
23
24
25
26
27
28
29
30
31
32
|
package com.example.spring.myapp.controller;
import java.util.List;
import java.util.Map;
import javax.annotation.Resource;
import org.springframework.web.bind.annotation.RequestMapping;
import org.springframework.web.bind.annotation.RestController;
import org.springframework.web.servlet.ModelAndView;
import com.example.spring.myapp.service.TestTableService;
@RestController
public class TestTableController {
@Resource
private TestTableService testtableService;
@RequestMapping(value="list")
public ModelAndView AllListView(Map<String, Object> map) throws Exception{
ModelAndView mav = new ModelAndView();
List<Map<String, Object>> AllList = testtableService.SelectAllList();
mav.addObject("Alllist", AllList);
mav.setViewName("list");
return mav;
}
}
|
cs |
별다른 내용은 없지만, 몇가지 설명을 해보도록 하겠습니다.
20줄 : @RequestMapping(value="list") -> /list로 url 요청시 처리하는 부분입니다.
21줄 : ModelAndView 를 이용하여, DB와 view를 동시에 보여주려고 합니다.
24줄 : Service의 전체 쿼리를 조회하는 Object를 Map형식으로 받아와 List 에 저장합니다.
26줄 : ModelAndView에 전달할 key와 Value를 저장합니다.
27줄 : list.html or list.jsp (본인 설정에 맞게 지금은 template/list.html로 전달할 예정)
28줄 : 리턴할 객체를 전달합니다.
다음으로 mybatis를 통한 SQL 제어를 위해 .xml 파일을 생성해보도록 하겠습니다.
기존 Eclipse에서 직접 SQL문을 전달할 java 코드를 짜야했다면, mybatis의 .xml mapping을 통해서 개발자가 다른 JDBC코드를 짤 필요 없이 쿼리문만 관리하면 된다는 이점이 있습니다.
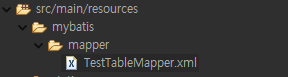
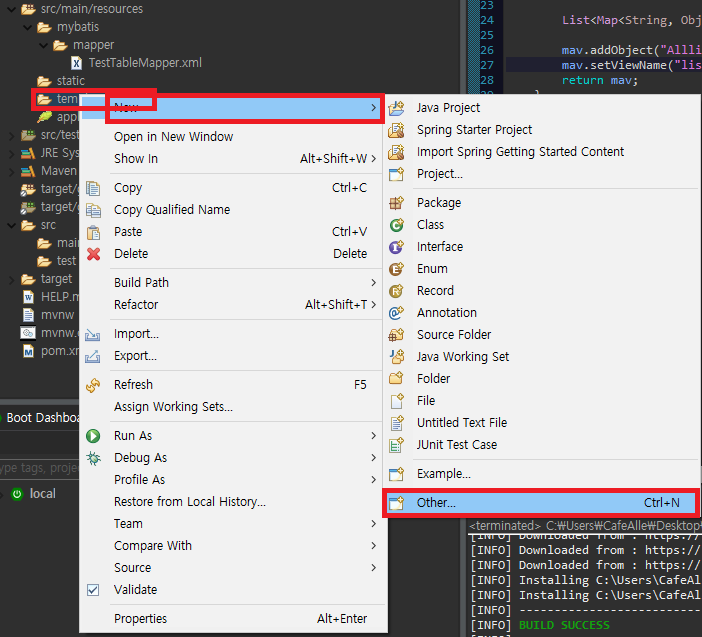
mybatis/mapper/testTableMapper.xml 생성하기
src/main/resource 의 하위에 다음과 같은 폴더를 생성해 보도록 하겠습니다.
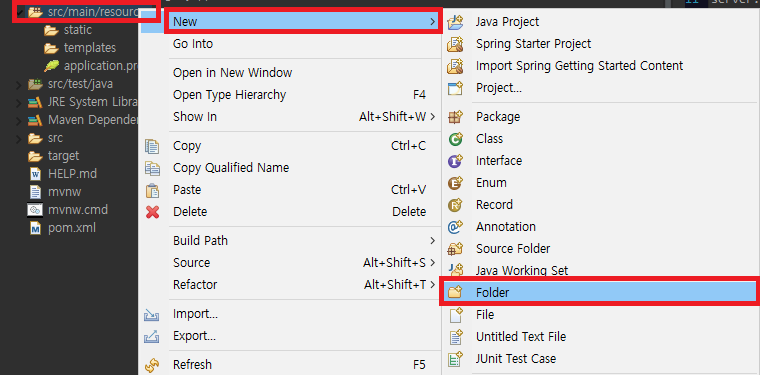
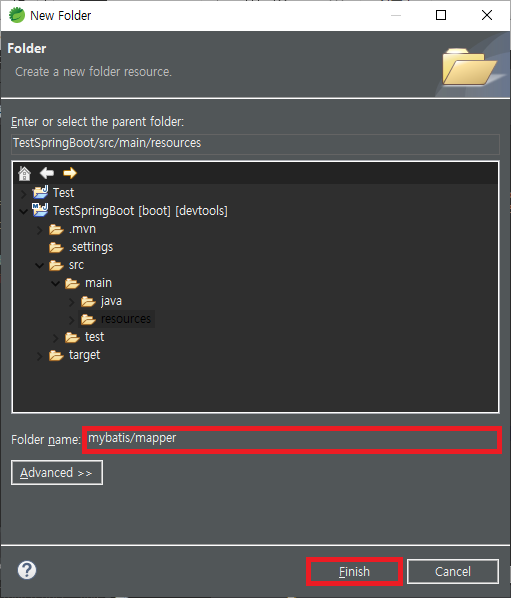
mapper 폴더의 하위에 TestTableMapper.xml 을 만들어 보도록 하겠습니다.
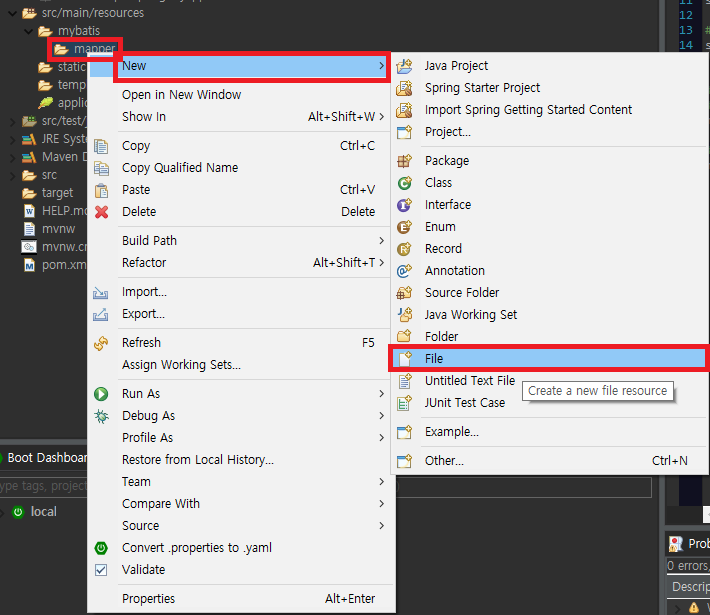
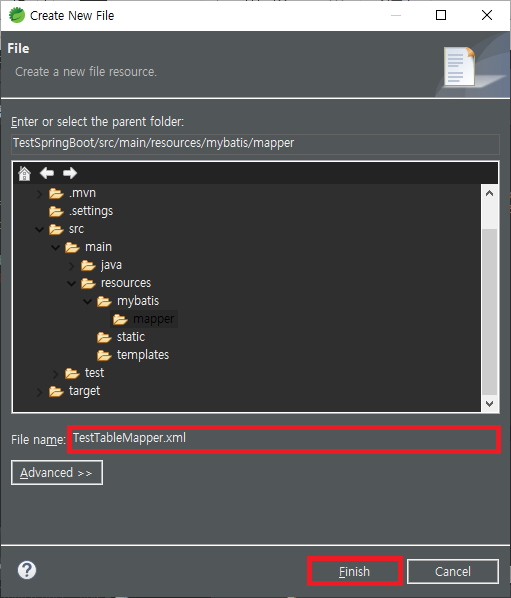
다음과 같이 생성하시면 됩니다.
|
1
2
3
4
5
6
7
8
9
10
11
12
|
<?xml version="1.0" encoding="UTF-8" ?>
<!DOCTYPE mapper
PUBLIC "-//mybatis.org//DTD Mapper 3.0//EN"
"http://mybatis.org/dtd/mybatis-3-mapper.dtd">
<mapper namespace="com.example.spring.myapp.model.mapper.TestTableMapper">
<select id="SelectAllList" resultType="hashmap">
SELECT * FROM testTable
</select>
</mapper>
|
cs |
mapper namespace : DB 접근 패키지의 Interface명까지 접근할 위치를 지정해주시면 됩니다.
select id가 중요합니다. 해당 id는 Interface의 메소드명과 완벽하게 일치하게 써주셔야 합니다.
추가적으로 resultType은 map을 통해 뿌려주는 부분만 테스트 할 것이기 때문에 hashmap으로 지정했습니다.
후에, 객체에 접근 할 일이 있다면 DTO로 바꿔주셔야 합니다.
또한 properties에서 상위 패키지를 설정했기 때문에 클래스명 혹은 Interface 명만 써주셔도 됩니다.
다음으로 아주 기본적인 Table 한개를 생성해 보고, properties를 통해 설정해두지 않은 부분들을 설정하겠습니다.
또한 view를 통해서 DB 연동을 눈으로 확인해보도록 하겠습니다.
오라클 설치가 안되어있다면, 아래 포스팅을 통해 설치 후 진행하도록 합니다.
Oracle database 11g 설치 및 Developer 설치하기
안녕하세요. 오랜만에 글을 쓰는 것 같습니다. 그 동안 공부도 하고, 회사일도 열심히 하느라 글을 남길 여유가 없었다는 핑계를 대면서! Oracle 설치 과정을 남겨보도록 하겠습니다. 의외로 새 프
hanhyx.tistory.com
Oracle table 생성
|
1
2
3
4
5
6
7
8
9
10
11
|
create table testTable(
userCode NUMBER(20),
userName VARCHAR2(50)
);
insert into testTable VALUES ('1234','홍길동');
insert into testTable VALUES ('5678','홍길순');
insert into testTable VALUES ('3435','둘리');
select * from testTable;
commit;//꼭해주세요. |
cs |
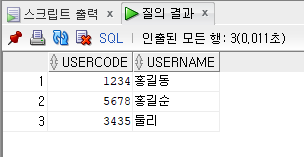
다음과 같이 데이터를 몇가지 입력해줍니다. (작명센스)
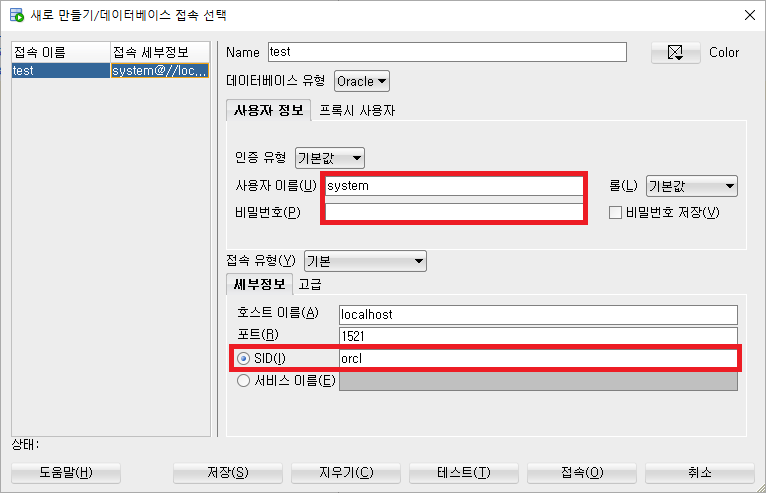
이제 properties의 접속 계정과 연동을 위한 설정을 위해 Developer 를 통해 다음을 확인한 후 properties에 설정을 해야합니다.
|
1
2
3
4
5
|
#db connection(Oracle)
spring.datasource.driver-class-name=oracle.jdbc.OracleDriver
spring.datasource.url=jdbc:oracle:thin:@localhost:1521/orcl
spring.datasource.username=(본인의 아이디)
spring.datasource.password=(본인의 비밀번호)
|
cs |
마지막으로 Thymeleaf를 이용하여 클라이언트 쪽에서 DB를 눈으로 확인해보겠습니다.
화면(View) 생성
resources 하위의 template/list.html 생성

list.html 생성 ( *주의 jsp가 아닌 Thymeleaf 템플릿은 html 입니다. )
나중에 JSP를 통한 흐름으로 바꿔보도록 하죠.

간단한 테이블을 통해서 확인해보도록 하겠습니다.
|
1
2
3
4
5
6
7
8
9
10
11
12
13
14
15
16
17
18
19
20
21
22
23
24
25
26
27
28
29
30
31
32
|
<!DOCTYPE html>
<html xmlns:th="http://www.thymeleaf.org">
<head>
<meta charset="UTF-8" />
<title>List View</title>
</head>
<body>
<div>
<H1>DB 연동 확인</H1>
<table border="1">
<thead>
<tr>
<th>userCode</th>
<th>userName</th>
</tr>
</thead>
<tbody>
<tr th:each="row:${Alllist}">
<th th:text="${row.USERCODE}"></th>
<th th:text="${row.USERNAME}"></th>
</tr>
</tbody>
</table>
</div>
</body>
</html>
|
cs |
몇가지 설명을 하겠습니다.
2줄 : thymeleaf 를 사용하기 위한 부분입니다.
4줄 : thymeleaf 의 특징은 모든 코드가 쌍태그로 이뤄져 있습니다. ( 즉, 모두 / 를 통해 닫아주어야 합니다. )
20줄 : thymeleaf에서 사용하는 방식의 for문이라고 생각하시면 됩니다. foreach 와 같은 맥락
row 라는 별칭을 주고, Controller에서 전달받은 메세지 "Alllist"를 받습니다.
21-22줄 : 컬럼명은 항상 대문자
결과 확인
localhost:(포트번호 기본 8080)/list 를 통해 결과를 확인해보도록 합니다.
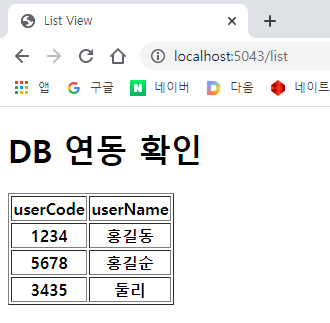
이로써 가장 기본적으로 springBoot-mybatis를 이용한 Oracle database 연동을 해봤습니다.
저도 만들면서 포스팅을 진행했기 때문에 중간중간 수정하였고, 포스팅과는 다르게 몇 가지 사소한 오류가 있을 수 있습니다.
ERROR
보통 자주 발생하는 오류만 설명 드리겠습니다.
1. Mybatis/mapper 의 경로와 properties,Application의 classpath 의 경로가 일치 하지 않는 경우
2. Mapper Interface 및 Service의 메소드들이 Mapper.xml의 쿼리문 ID 값과 일치 하지 않는 경우
(ex. 위 프로젝트를 예를 들면 "SelectAllList" 의 id값이 각각의 메소드명과 다른 경우)
3. properties 의 오라클 전역 데이터 베이스명과 userId,password가 일치하지 않는 경우
4. 오라클 서버 설치 시 UTF-8 로 설치 하지 않은 경우, 보통 sqlplus가 깨져서 보이면 다시 설치하는 것이 좋습니다.
아래 링크를 통해 재설치하시길 바랍니다.
hanhyx.tistory.com/41?category=710727
Oracle database 11g 설치 및 Developer 설치하기
안녕하세요. 오랜만에 글을 쓰는 것 같습니다. 그 동안 공부도 하고, 회사일도 열심히 하느라 글을 남길 여유가 없었다는 핑계를 대면서! Oracle 설치 과정을 남겨보도록 하겠습니다. 의외로 새 프
hanhyx.tistory.com
5. Thymeleaf 문에서의 대소문자 구분 및 홀태그로 인한 오류
6. 그 외 .mxl의 테이블명 불일치,mapper namespace 패키지위치 불일치 ( Mapper의 인터페이스 명까지 정확하게 설정 해야함 )
등등 차근차근 확인해보시길 바랍니다.
다음 포스팅부터 이 기본파일을 이용하여, AJAX를 이용한 쿼리 검색 및 비동기식 테이블 화면 생성과, template 대신 jsp를 이용한 view를 통한 구조, 데이터의 QR코드 생성 후 스캔하여 데이터 조회, error 페이지 작성 등 재밌는 작업해 보도록 하겠습니다.
마지막으로 파일 첨부를 같이 해두었습니다.
용량 때문에, 최소한의 결과물만 업로드 하였습니다. 참고하여서 진행하시길 바랍니다.
'Web > SpringBoot-mybatis' 카테고리의 다른 글
| SpringBoot Mybatis Oracle을 이용한 Pagination 객체, Paging 처리 화면처리 하기 총 정리 (6) | 2020.11.23 |
|---|---|
| SpringBoot Maven Oracle JDBC 연동 시 repository의 지정된 경로를 못 찾을 때 Local에서 Maven 빌드 하는 방법 (0) | 2020.10.28 |
| Springboot JSP view 설정하기 (0) | 2020.10.28 |